


There are so many different gun cleaning kits and accessories available today, a new gun owner can easily get overwhelmed when purchasing their first kit. Here you will find a complete guide to gun cleaning, including the best commercial kits and the most important pieces you need to include in your gun cleaning kit. We will also discuss how to clean your gun, step by step, to ensure that your gun is safe each time you use it, and you get maximum enjoyment from your new purchase.
Best Commercial Gun Cleaning Kits For Sale
There are some great gun cleaning kits on the market today. There are kits for specific types of guns (small pistol, large pistol, rifle, shotgun) and also larger kits that include pieces for all types of guns. Here are some of the best kits available right now.
Gloryfire Elite Cleaning Kit
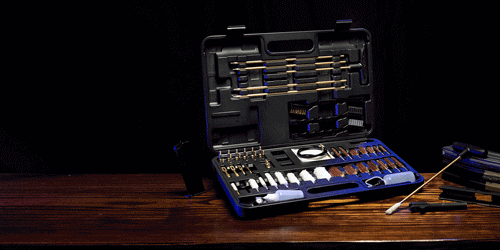
The Gloryfire Elite Cleaning Kit has tons of technology behind it. Before they made it, they studied all of the high-end bore brushes on the market. This allowed them to create the world’s best bore brushIf you’re looking for one kit to rule them all, so to speak, the Gloryfire Elite is the kit you’ve been looking for. It has just about everything you’d need to clean any gun in your inventory. Here’s an inventory of exactly what’s included in the Gloryfire Elite:
- Before developing this gun cleaning kit, we studied all the high-end American gun brushes on the US market, analyzed their advantages and disadvantages, and made improvements. This elite gun cleaning kit is now the best in quality among the same price gun brushes on the amazon market, which improves most of the existing problems on the US market and offer all the shooting amateur perfect gun cleaning kits as far as possible.
- Elite version meets the highest quality standard s for the U.S. market. Thickerbrass wire is harder and more durable. The cores of the brass brushes and mopsare made of high-quality iron, better toughness.
- We provide you more calibers to fit more types of guns. Brass brushes: .17 / .20 / .22 / .35 / 9mm / .40 / .45 / .22 / .243 / .270 / 5.56mm / .38 / .30 / .410 / .50 / 12GA / 16 GA / 20GA / 28GA; Brass jags: .17 / .22 / .248 / .35 / 9mm / .25 / .270 / .30 / .338 / .375 / .40 / .44 / .45 / .50; Cotton mops: .17 / .30 / .40 / .22 / .35 / 9mm / .410 / .50 / 12GA / 20GA.
- We spent more than a year to develop the rods, we tried aluminum, copper, stainless steel and many other materials, and studied the structure of the rods. After continuously studying and breaking more than 600 rods, we developed this reinforced and lengthened rod, which is applied for the us patent. This rod is made of special material, with a total length of 37.8’’inch, suitable for longer barrel use and won't break easily. It is the best quality rod in the same price.
- We spent a lot of time developing the brass brushes. 1. The core is made of aluminum, which is not easy to bend in the process of using. 2. Unlike those ordinary brass made in China, we use high-quality brass to ensure a longer service life of the accessories. 3. The bristles of the brass brush are made of high quality brass and are not easily bend or shed. 4. Except for .17, all the other brushes have the same caliber, so you don't have to waste time looking for the right adapter.
- We also thought a lot about the details. To solve the problem that plastic cases are easy to be damaged, we use more durable materials, and now our cases are more durable. Besides, other brands use non-woven fabrics, but we offers 100% cotton fabric with higher cost and better quality. The cases and accessories are marked with calibers so that you can find the one you need more quickly and put back more conveniently. All accessories are of higher quality, give you a better use experience.
The Gloryfire Elite has everything you need to clean every rifle, handgun, shotgun, and even muzzleloader in your collection. It’s the most complete gun cleaning kit I’ve ever seen sold commercially. At less than $70, the Gloryfire Elite is reasonably priced for all that it includes. It’s great if you have a large gun collection or if you shoot multiple guns frequently. If you were to try and build a gun cleaning kit with all of these pieces separately, it would cost several hundred dollars, so in that sense, the Gloryfire Elite is a good value. Still, it’s not for everyone.
Otis Tactical Cleaning Kit
If you’re looking for something a little smaller, but still great for multiple guns, Otis offers a Tactical Cleaning Kit for some of the most common guns. This kit was actually standard issue for U.S. Military members deploying to Iraq and Afghanistan several years ago. The kit was specifically designed to be light and easy to carry, yet able to clean all common tactical rifle, handgun, and shotgun calibers. Here’s what’s included in the Otis Tactical Cleaning Kit:
- 100% cotton 2" & 3" patches (10 each), 3 slotted tips & 2 patch savers®
- Six firearm specific bronze bore brushes with size marked on brush stem (.22/.223, .270, .30/.308/30-06/30-30, .38/9mm, .45 cal, 12 ga)
- 8" and 30" aircraft grade Memory-Flex® cables and thread connector for proper Breech-to-Muzzle® cleaning
- 34" aircraft grade Memory-Flex® cable (5-40 thread) with slotted tip is small enough to clean .17 caliber firearms
- Small & large obstruction removers knock out mud, snow & stuck casings
- T-handle quickly attaches to cable for added comfort
- Also includes chamber flag, 0.5 fl. oz. Shooter’s Choice FP-10 Lubricant Elite® CLP & instruction manual
- All items packed neatly in a 4"x4"x2.5" soft pack case
I think the best feature of the Otis Tactical Cleaning Kit, besides the variety, is how small it is. It is barely larger than a hockey puck and fits neatly in your range bag or gun safe for when you need it. It’s hard to imagine that they can fit all of those cleaning components in such a small package. It’s also a great choice if you’re going on an extended hunting trip. The Otis Tactical Cleaning Kit will cost around $50 at most retailers. Not too expensive when you consider all that you’re getting.
Hoppe’s No. 9 Deluxe Cleaning Kit
If you’re looking for something a little more reasonably priced, the Hoppe’s No. 9 Deluxe Cleaning Kit is a great option. It comes with some great cleaning accessories. It includes:
- Lubricating oil
- 3-piece brass rod
- 4 slotted jigs
- Silicone cleaning cloth
- 4 brass bore brushes
- Cotton patches
- Wooden carry case
Hoppe’s No. 9 is a name known for their lubricating oils, but have since branched out to making cleaning kits as well. The kit retails for less than $40 on Amazon and has by far the best carrying case of all of the kits I’ve seen. If you’re looking for a basic universal cleaning kit and a nice box to store it in, check out Hoppe’s No. 9 Deluxe Cleaning Kit.
How To Clean Your Firearms
Cleaning your firearms regularly as well as after each use will ensure that they function properly and safely the next time you use them as well as extend the life of the gun. It’s important to understand that while most guns are capable of firing without regular cleaning, it’s damaging and unsafe to do so. We talked above about some commercial cleaning kits available, but if you don’t want a one-size-fits-all kit, you can put your own kit together. Some shooters choose to do this because they have favorite cleaning accessories such as gun snakes or certain brushes that they use more frequently than other items. If you’re an experienced gun owner, you probably have your favorite items in your gun cleaning kit. But if you’re new to guns, here’s a list of items that every gun cleaning kit should have in it:
- Rag/old t-shirt - There are myriad uses for a rag or old t-shirt, too many to list. Its most common use is wiping down the exterior of your gun to keep oily fingerprints and excess lubricant off of the finish. It’s also a good idea to lay down a rag or t-shirt while you’re disassembling your guns and lay the components on the rag. Get into a habit of doing each cleaning the same way and you will be less likely to lose small pieces.
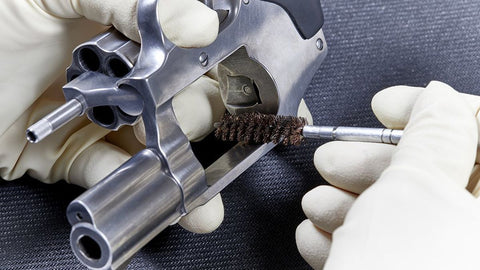
- Bore Brush - A bore brushes are made for specific calibers, so find the correct bore brushes for the guns you own. Calibers of similar diameter can use the same bore brush, for example: .38 Special and .357 Magnum, .40 S&W, .44 Colt and .45 ACP, or .22 LR and .223 NATO. With your bore brush, you will need a rod to connect it to in order to clean the entire length of the barrel. The most common type is a brass rod that comes in several sections that screw onto each other. That way, you can add sections until your rod is the length of your barrel.
- Jigs and Patches - No, not fishing jigs. A jig is a slotted piece that attaches to the end of your rod the same way the bore brush does. In the jigs slot, you insert a small fabric patch. These patches are used after the bore brush to remove the carbon buildup in the barrel. Jigs usually come in nylon (like plastic) and brass. I prefer the brass jigs because they last longer.
- Toothbrush - A toothbrush is a great item to keep in your cleaning kit. The bolt of a rifle tends to get carbon buildup pretty badly, and a toothbrush is great to knock off the big chunks. You can also use a toothbrush to get dirt, sand, and other buildup out of cracks and crevices on the exterior of your guns.
- Dental Pick - What the toothbrush can’t reach, the dental pick can. It’s great for getting into the small spaces on the bolt or inside the chamber. The toothbrush is for general cleaning, while the dental pick is for detailed cleaning.
- Gun Snake - A relatively new product for cleaning guns is a gun snake. It’s a soft, flexible cord with bristles along its length. It has a weighted end to help get it through the barrel, and the other end has a modified bore brush. Once you put the weighted end through the barrel and it comes out the other side, simply pull the rest of the snake through the barrel. It does the same job as a bore brush, without the need to attach and detach brushes and rods.
- Lubricant - No gun cleaning would be complete without some gun oil. There are many different brands and types available, such as Hoppe’s No. 9, Rem Oil, or Break Free. The lubricant has many jobs. In fact, in the military, it’s called CLP (cleaner, lubricant, protectant). Like the name says, you can use the oil to help clean your guns during cleaning time. Adding a drop of oil will loosen chucks of carbon buildup so that it can be easily wiped off. You can (and should) also use gun oil before firing to lubricate the moving metal parts. And finally, when you store your firearms, a light coat of gun oil will protect the metal parts from rust.
Cleaning Tips
Before we get into the meat and potatoes of cleaning your firearms, here are some helpful tips to remember when cleaning.
Well Ventilated Area
When you begin a gun cleaning session, make sure that you are in a well-ventilated room. A ceiling fan or open windows, or both, are preferable to keep the air moving. The reason you want the air moving is that as you clean, carbon and expended gun powder will be released into the air in addition to the chemical lubricants you are using. All of this can be damaging to your lungs if inhaled for long periods of time. So to be safe, remember to always clean in a well-ventilated area.
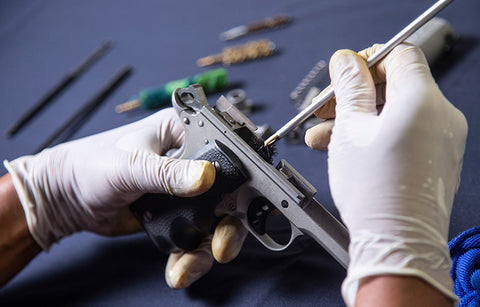
Wash Your Hands or Wear Gloves
This one has two reasons. First, oils from your hands can leave fingerprints on the exterior of your gun, which can damage the finish. Second, you don’t want carbon and CLP building up on your hands. It’s too common for most of us to unknowingly touch our faces and mouths, and you certainly don’t want to do that with CLP or carbon on your hands.
Unload Your Gun
Seems like common sense, right? You would be amazed at the lack of common sense in some people. Before you handle any gun, you always need to make sure that it’s unloaded and that the chamber is clear. REMEMBER: Just because you remove the magazine from the gun does NOT mean the gun is unloaded. Check the chamber. Never attempt to clean a loaded gun.
Step-By-Step Cleaning Process
For this step-by-step guide, I will be working with a pistol. The steps are the same, however, for all firearms.
Remove Magazine/Clear
Like we just talked about, never attempt to clean a loaded gun. The first step will always be to make sure your gun is clear and unloaded.
Disassemble
Some guns can be quite complicated to disassemble, so if you’re unfamiliar with the process, consult your owner’s manual or YouTube. Most semi-automatic pistols have a similar takedown process. It usually involves locking the slide to the rear and removing a takedown pin or moving a takedown lever. Once you engage that pin or lever, guide the slide forward and it will slide completely off of the lower receiver. In the slide is the barrel, which will also contain a spring and guide rod. The lower receiver usually doesn’t break down any further during routine cleanings. Those are the five parts of most semi-automatic pistols: Barrel, spring, guide rod, slide (or upper receiver), and lower receiver. (In some more modern guns, the spring and guide rod are combined and do not come apart.)
Cleaning
What’s most important when beginning your cleaning is that you form a pattern and always clean the same way each time. This is to ensure that you don’t miss any parts during the cleaning process. Here’s the way I clean my pistols:
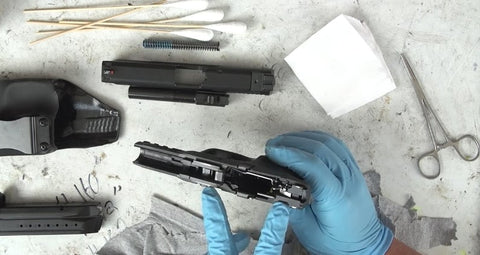
Slide
After disassembling, I lay the pieces out on my rag or old t-shirt. I always clean the slide first. If you fired lots of rounds, or if you’ve shot it several times without cleaning it, there may be carbon buildup on the underneath of the slide. It forms particularly on the underneath rear, where the hammer strikes the primer. Use a dental pick to get into the small grooves on either side of the slide. Some drops of CLP on the underside of the slide will break up the carbon. Once you’ve gotten into all of the small grooves and crevices, wipe the slide down with a rag or t-shirt. Once it looks like you’ve gotten all of the dark-colored carbon off of the slide, go over it once with a cotton patch. If you find dark streaks on the patch, keep wiping. Wipe until you can’t pick up dark streaks with the patch anymore.
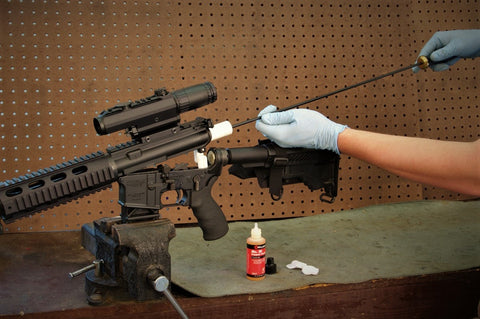
Barrel
The barrel is next. The first step is to clean the inside of the barrel. Depending on your preference, you can use a gun snake or a jig and cotton patch. It’s important to remember to only swab the barrel in one direction, not back and forth. Swabbing in one direction removes the dirt and carbon from the barrel, going back and forth simply moves the dirt back and forth. If you’re using cotton patches, make sure you use a new patch each time you swab. You don’t want to be putting old dirt and carbon back into the barrel from a dirty patch.
After you’re satisfied that you’ve cleaned the inside of the barrel, give the outside a quick wipedown with a rag or t-shirt. This will remove fingerprints and any dirt or carbon that may have gotten on the outside of the barrel during the cleaning process.
Spring and Guide Rod
The spring and guide rod are the easiest parts of the pistol to clean. Starting with the guide rod, simply wide it down with a clean cotton patch or your trusty t-shirt. There shouldn’t be too much carbon buildup on the guide rod because it’s so far away from the chamber. The spring is next. The way I usually clean the spring is to hold a rag in my hand and place the spring in the rag. Then I rotate the spring in a circular motion so that the grooves of the spring go around in a circle. This will eventually wipe all surfaces of the spring with the rag. There shouldn’t be any need to use anything besides a rag on the spring.
Lower Receiver
I save the lower receiver for last because it has the most tight spaces and usually requires the most work. It’s a good idea to use a dental pick on hard-to-reach places where dirt and carbon can build up. Places like the safety, the trigger, the magazine release, the slide catch, and inside the magazine well can all be places dirt likes to hang out. Go over each of those spots with your dental pick, digging out dirt and carbon from the cracks and small spaces. After you’ve done that, take a rag and wipe down the exterior of the lower receiver to remove any dirt and dust still hanging around. Next, take the rag and wipe inside the lower receiver. There are rails that the slide “slides” along which can be a hiding place for dirt. Make sure you give the feed ramp a good wipedown. That’s an important part of the feeding and chambering process, so you don’t want any dirt there. Inside the magazine well is another important place to clean. Keep the magazine well clean of debris so that your magazines load smoothly.
Reassembly
Now that you’ve done a thorough cleaning of the entire gun, you want to go back and wipe all of the parts down again with a clean rag before reassembling it. This is to remove any dirty lubricant that was used in the cleaning process. Give each component piece a good wipe and then reassemble the gun. First, place the guide rod and spring back into the barrel, then place the barrel into the slide. Finally, place the slide back onto the lower receiver and lock the slide to the rear. Replace the takedown pin or takedown lever, and let the slide go forward.
Lubricate
Something that you should always remember to do after cleaning your guns is to lubricate them for storage. This is not to be confused with the lubrication you do before firing. When storing your guns, place a light coat of oil on all exposed metal parts. This usually means the barrel, the trigger, the hammer, and the frame of some guns like 1911s. This light coat of oil will help repel moisture and keep the metal parts from rusting during storage. Only a light coat of oil is required. That’s compared to heavy amounts of lubricant used when firing to keep metal parts moving smoothly against each other.
Wash Hands
After you’ve given the exposed metal parts a light coating of gun oil, wash your hands one final time. This is because you have undoubtedly gotten dirt, grim, carbon, and lubricant all over your hands during the cleaning process. The last step is to give the gun one last wipedown, and you don’t want to do that with grimy hands.
Final Wipedown
Using a clean rag, give your gun one final wipedown, looking for excess oil or fingerprints on the finish. Once your gun is wiped down and stored safely, you can give your cleaning kit a wipedown as well. Wipe your gun snake, bore brushes, jigs and cleaning rods. There’s no use cleaning the next gun if your tools are dirty. Put each tool away after it’s been wiped down. Check your supply of oil and patches. If either are low, make a note to replenish your supply.
Conclusion
Cleaning your weapons is just as important as wearing hearing and eye protection and using the proper ammunition. It’s an important safety precaution, and one that cannot be overlooked. There are excellent gun cleaning kits available commercially, or you can build your own custom gun cleaning kit by buying component parts individually. Good quality cleaning tools are not expensive, and can extend the life of your firearms when cleaned routinely. Remember to clean your guns every time after shooting them, as well as periodically when they are stored for long periods of time. In this article you’ve learned the basic steps to keep your guns cleaned. You don’t have to follow this order exactly. Instead, hit the basics and find a process that works for you. Remember to clean your guns the same way each time to keep from missing important parts. Always remember to be safe shooting, and have fun.
Past topics:
5 Best Gun Cleaning Kits On The Market Today – Reviews and Guide
All you need to know about Gun Cleaning Kits
Best 9MM cleaning Kits 2021- Buying Guide