


How to Use Gun Cleaning Kit
In this article, we are going to talk about how to use a gun cleaning kit. A clean gun is a reliable gun. Regular cleaning removes residue and debris, preventing damage and ensuring accuracy. A dirty gun can be deadly, causing misfires that can have catastrophic consequences. Cleaning your gun is crucial for safety, reliability, and performance.
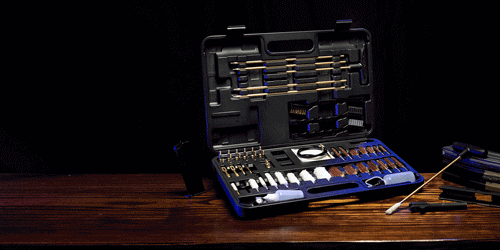
Introducing our Gloryfire Complete Gun Cleaning Kits: All-in-one solutions for cleaning and maintenance. Each kit includes the essentials in a convenient case, perfect for new gun owners. Universally designed, these kits are compatible with most firearms, providing a great starting point for keeping your gun in top condition.
In this article, we will give you a full introduction about our gun cleaning kit.

Brass Rods
Using a brass rod is effective for maintaining your firearm’s cleanliness without risking scratches or damage to the bore.
Here’s how to use a brass cleaning rod effectively:
- Assembly: If your brass rod comes in sections, screw them together securely to create a single, long rod.
- Attach Brush or Jag: Depending on your cleaning method, attach either a brush (for scrubbing) or a jag (for patching) to the end of the rod. Make sure it’s firmly attached.
- Insert into Barrel: Carefully insert the brass rod into the barrel from the chamber end (if applicable). Ensure you push straight to avoid bending the rod.
- Cleaning Motion:
- With a Brush: If using a brush, move the rod back and forth to agitate fouling and debris. This helps remove carbon buildup.
- With a Jag and Patch: If using a jag, push the patch through the barrel in one smooth motion and then pull it out.
- Remove and Inspect: After several passes, remove the rod and inspect the brush or patch for fouling. If it’s dirty, replace it with a new one.
- Repeat as Needed: Continue cleaning with fresh brushes or patches until they come out clean, indicating that the bore is free of fouling.
- Final Check: After cleaning, you may want to run a dry patch or mop through the barrel to remove any remaining solvent or moisture.
- Storage: After use, clean the brass rod with a cloth to remove any solvents or debris, and store it in a protective case.

Bronze Brush
A cleaning brush is essential for removing fouling and debris from your firearm's bore and helps maintain your firearm’s accuracy and reliability by keeping the bore clean.
Here’s how to use them effectively:
- Choose the Right Brush: Select a brush that matches the caliber of your firearm. Common materials include bronze or nylon.
- Attach to Rod: Secure the brush to your cleaning rod, ensuring it’s tightly fastened.
- Apply Solvent: If desired, apply a cleaning solvent to the brush to help break down fouling.
- Insert the Brush: Insert the brush into the barrel from the chamber end (if applicable), pushing it through to the muzzle.
- Cleaning Motion: Use a back-and-forth motion, pulling the brush through the barrel multiple times. This agitation helps dislodge carbon and other fouling.
- Check Progress: After several passes, remove the brush and inspect it for debris. You may need to change brushes if they become too dirty.
- Follow Up: After brushing, you can follow up with a patch and jag to pick up any remaining debris.
- Final Rinse: Optionally, run a dry patch through to ensure the barrel is clean and dry.

Spear-Pointed Jags
Spear-pointed jags are specialized cleaning tools designed for efficient cleaning of firearm bores. They are particularly useful for their ability to grip patches securely and provide thorough cleaning, making them a valuable addition to any gun cleaning kit.
Here’s how to use them effectively:
-
Attachment: Connect the spear-pointed jag to your cleaning rod. Ensure it’s securely fastened to prevent it from detaching during use.
-
Patch Preparation: Cut cleaning patches to size if necessary. The patch should be slightly larger than the jag to ensure a tight fit.
-
Patch Application: Place the cleaning patch over the jag’s spear-pointed tip. The pointed design helps to secure the patch in place.
-
Insert into Barrel: Insert the jag with the patch into the barrel from the chamber end (if applicable). Ensure the rod is straight to avoid bending.
-
Cleaning Motion: Push the jag through the bore, using a smooth motion to draw the patch through. The spear-point design helps to scrape fouling and debris more effectively than standard jags.
-
Remove and Inspect: Pull the jag and patch out of the barrel and inspect the patch for dirt and fouling. If it’s dirty, change the patch and repeat the process.
-
Repeat as Necessary: Continue to use fresh patches until they come out clean, indicating the barrel is clean.
-
Final Pass: After cleaning, you can run a dry patch through the barrel to remove any remaining solvent or moisture.
-
Storage: Clean the jag after use and store it in a protective case to maintain its shape and effectiveness.

Slotted-Patch Loops
Slotted patch loops are tools used to hold cleaning patches securely while cleaning a firearm's bore. They are versatile and effective for thorough bore cleaning, making them an essential part of any gun cleaning kit.
Here’s how to use them effectively:
- Attachment: Connect the slotted patch loop to your cleaning rod. Ensure it’s tightly fastened to prevent any detachment during use.
- Patch Insertion: Take a cleaning patch and slide one end through the slot in the loop, then fold it over the other side. This creates a secure hold for the patch.
- Insert into Barrel: Carefully insert the slotted patch loop with the attached patch into the barrel from the chamber end (if applicable), ensuring it’s pushed straight to avoid damage.
- Cleaning Motion: Pull the rod through the bore in a smooth motion. The patch will scrape and absorb fouling and debris as it passes through.
- Remove and Inspect: After a few passes, pull the loop out and check the patch for dirt. If it’s dirty, replace it with a fresh patch.
- Repeat as Necessary: Continue using new patches until they come out clean, indicating the barrel is adequately cleaned.
- Final Dry Pass: Optionally, run a dry patch through the barrel to ensure no solvent remains.
- Storage: After use, clean the slotted patch loop and store it properly to maintain its shape and functionality.

Brass Adapters
Brass adapters are used in gun cleaning kits to connect different cleaning components, ensuring compatibility between various sizes and types of rods, brushes, or jags. They are essential for versatility in gun cleaning, allowing you to mix and match tools for optimal performance.
Here’s how to use them effectively:
- Select the Right Adapter: Choose a brass adapter that fits the cleaning rod and the accessory you intend to use (like a brush or jag).
- Attachment: Screw the brass adapter onto the end of your cleaning rod securely. Make sure it’s tight to prevent it from loosening during use.
- Connect Accessories: Attach your brush, jag, or other cleaning tool to the other end of the adapter. Again, ensure it’s securely fastened.
- Insert into Barrel: Use the assembled rod and adapter to insert the cleaning tool into the barrel from the chamber end (if applicable).
- Cleaning Motion: Perform your cleaning routine, whether it’s brushing, patching, or using a mop.
- Remove and Inspect: After cleaning, remove the adapter and inspect the cleaning tool for fouling. If it’s dirty, replace it and repeat as needed.
- Final Clean-Up: Once finished, disassemble the adapter and cleaning components for cleaning and storage.

Muzzle Guards
Muzzle guards, often referred to as muzzle protectors or muzzle caps, are used to protect the muzzle of your firearm during cleaning and storage. Using muzzle guards is a simple yet effective way to ensure the longevity and performance of your firearm.
Here’s how to use them effectively:
- Purpose: They prevent debris, dust, or moisture from entering the barrel, which can lead to corrosion or damage.
- Installation: Simply slide the muzzle guard over the muzzle of your firearm. Make sure it fits snugly but isn't too tight to avoid damaging the crown of the barrel.
- During Cleaning: If you're using a cleaning rod or brush, you can keep the muzzle guard on to prevent any accidental scratches or damage while cleaning.
- Storage: Always use a muzzle guard when storing your firearm to maintain its integrity and cleanliness.
- Removal: Before using your firearm, remove the muzzle guard carefully to avoid any debris falling into the barrel.

That's a wrap for today's article! We've covered the first 6 essential parts of a gun cleaning kit and how to use them. Stay tuned for our next article, where we'll dive into the remaining 6 components and explore what sets our Gloryfire gun cleaning kits apart from the rest. Thanks for reading, and we'll see you in the next article!
Here is the shop link: GLORYFIRE Gun Cleaning Kit Universal for All Guns Elite Rifle Shotgun Pistol Cleaning Kit
Thanks for supporting us!