


 Want your gun to work in an efficient way? Want to maximize your gun’s performance? Want to prolong the service life of your firearm and get the most out of it?
In addition to keeping one, cleaning your gun can be regarded as the second most worth mentioning thing for your safety and security. Gun cleaning guarantees improved gun performance. Besides, cleaning your gun regularly benefits you in the long run as it adds to a gun’s life.
A question you may ask here is what’s the point of cleaning a new gun? Let us untangle this knot for you. Nearly all of the new guns are coated with a layer of adhesive solvent and lubricant to avoid rusting. This coating needs to be cleaned and removed before you can start using the gun.
Now, you may wonder how you can clean your firearm properly. This post shall straighten out the steps to be followed for cleaning a gun. The usage of gun cleaning tools to be used throughout the cleaning process shall also be discussed in detail.
Steps to be followed:
Step#1: Wash Your Hands or Wear Gloves
- The first and foremost step is to wash your hands appropriately. This step is to ensure the prevention of lubricant from getting into the inner and outer parts of the gun. Not following the step may make your gun dirty and inefficient instead of cleaning it.
- Furthermore, it is more appropriate to wear gloves throughout the cleaning procedure. Doing so prevents oil and lubricant from getting absorbed into your skin. Wearing gloves becomes more significant when you are used to cleaning your gun more frequently. In this case, not wearing gloves may let the lubricant be absorbed into your skin more often. This may damage your skin, cause skin irritation and other related issues.
Step#2: Unload the Gun
While cleaning, you may accidentally discharge your gun. To avoid such probabilities, unload your gun before cleaning. This step is very important for safety concerns. Therefore, make sure you have unloaded the gun before you start cleaning it. Double-check this step to ensure safety.
Pro tip: While making sure of unloading the gun before cleaning, also don’t forget to keep the ammo out of reach. Doing so prevents the chances of shooting the ammo which may probably be done if placed nearby.
Step#3: Use a Gun Snake
Gun snake can save your time. Before using cleaning rods, you can use a gun snake to get rid of some gunk. It takes a few seconds to use a gun snake but can save a lot of time.
Get the top-notch gun snake for your gun cleaning kit by clicking here.
The above-mentioned gun snake works exceptionally well. This gun snake comes with multiple features which gives it an upper hand over its competitors. Here are a few features of the Gloryfire gun snake:
- Our Gun Snake is made from memory-steel cable and a rope. It has the tendency to disassemble easily and can be easily placed into the gun’s barrel
- Gloryfire gun cleaning snake has a high capacity to absorb the gun cleaning solvent. This makes the cleaning process quick and clean.
- It is quite lightweight, and thus can easily be carried anywhere.
- Our gun snakes are made out of a durable material with a pull strength of up to 750 Lbs.
- It is washable even in the washing machine or in the sink.
Step#4: Disassemble Gun Parts
The next step is to disassemble your gun parts. You may adopt any one of these methods to disassemble the gun properly.
- Read the gun’s user manual and follow the steps mentioned
- Search for it on the internet. Different websites may provide you with wholesome information in this regard
- Watch a YouTube video about it and follow the procedure been explained
Pro Tip: It is highly preferred and recommended to use a gun cleaning mat to keep the countertop clean. Using a gun cleaning pad will not only keep the countertop clean, but also protect the surface from oil, solvents, and scratches.
If you already have a gun cleaning mat, then it is the best time to use it. If you don’t have one, no need to worry.
Step#5: Use Cleaning Rods
The next step requires the usage of cleaning rods and brushes. It is recommended to assemble the available cleaning rods first. Assembling your favorite cleaning rods will assist you in choosing the appropriate-sized brush.
After choosing an appropriately sized bronze cleaning brush, start the cleaning with the help of a gun cleaning solvent. All you have to do is to pull the brush through your gun fitly. Pull the brush through at least 5-10 times. Make sure to pull the brush, and not pull.
Pro Tip: Make sure that you run the bore brush in the same direction the bullet travels, and not in the opposite one.
Cleanliness Check: Take a cleaning patch. Pull it out the same way you pulled the brush. If the cleaning patch comes out clean and white, it is time to move to the next step. And if it does not, then you need to run the bore brush through your gun again.
Step#6: Remove all Solvents
Remove all the solvents initially applied. You may use dry cleaning patches and gun mop attachments to clean out the inside parts of the gun. Do it thoroughly to clean the gun from the inside.
Step#7: Lubricate the Gun
Dirt and rust start accumulating on the gun as time passes. Therefore, it is necessary to lubricate your gun to protect it from corrosion effects.
Make sure to apply a small amount of lubricant around the mechanics as it further improves the gun’s performance and efficiency.
Step#8: Clean the Exterior
After you have finished lubricating the gun, the next step is to clean the gun’s exterior. To clear the exterior, you may use a double-sided wire toothbrush. Besides the brush, you may require some cleaning gel as well. Simply apply some cleaning gel of your choice over the brush. Scrape off the areas to be cleaned. Watch out for the rusty areas and clean them more attentively. Tiny rust spots may seem resistible at the moment but they spread out in sizeable amounts very quickly.
Step#9: Wash Your Hands
Remove your gloves after you have successfully cleaned the gun’s exterior. Wash your hands adequately afterward. While cleaning, there is a probability of getting your fingerprints on the gun. To avoid the formation of fingerprints, pour a little amount of oil on your palm. Rub it on both of your hands, and you are good to go to the next step.
Step#10: Assemble Your Gun
You are almost done with cleaning your gun. Put all the disassembled pieces back together. Refer to the user’s manual, internet, or watch a YouTube tutorial to learn about the assembling process. It is necessary to carry out this step properly as it may affect your gun’s functioning. Furthermore, be very sure your hands are lubricated before you put back all the pieces.

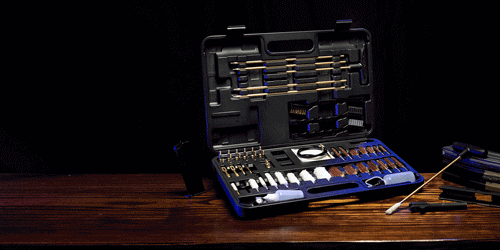
Advantages and Disadvantages of a Gun Cleaning Kit
To carry out the cleaning procedure, you may use a gun cleaning kit. Using a cleaning kit can benefit you in several ways.
Advantages
A gun cleaning kit can comfort you with the following advantages:
- Gun Cleaning Kit provides you with all the necessary tools together.
- You have all the suitable tools assembled in a gun cleaning kit
- You can utilize them again anytime anywhere.
- It takes less time to carry out the cleaning process with appropriate tools.
Disadvantages
Anything that comes with benefits has its disadvantages as well. Following are the disadvantages of a gun cleaning kit:
- It may cost you a little (but worth it)
- It requires some expertise to utilize them well
Nevertheless, possessing a gun is the ultimate reason to own a gun cleaning kit. Undoubtedly, a gun cleaning kit assists you in carrying out your gun cleaning process more competently and professionally.
We want you to own the best gun cleaning kit in the market. So, what are you waiting for? Grab one by clicking here. However, this kit doesn’t contain different oil types.
What Did We Not Tell You Already?
To tell you a fact, engaging yourself in assembling, dissembling, and cleaning activities will increase your information about the firearm’s internal structure. Analyzing the internal gun components and mechanical process creates a new level of respect for your weapon. You may also sell your services as a gun cleaning specialist in the market, and earn some bucks! Cleaning the gun not only assists the weapon to reach the end goal of propelling around but also helps you employ your firearm in an enhanced way.
Conclusion
To conclude, a gun cleaning kit is essential to increase your gun’s service life and to improve its performance. This article has guided you about the entire gun cleaning process using a reliable gun cleaning kit. Don’t forget to unload your gun before starting the cleaning process. It is also recommended to wear gloves before proceeding with the cleaning to protect your hands from harmful gun cleaning solvents. You may sell your services as a gun cleaning expert and earn some dollars! Don’t forget to share this article with your friends if you found it helpful in any way!
Past topics:
1.5 Best Gun Cleaning Kits On The Market Today – Reviews and Guide
2. What are the necessary Parts of a Gun Cleaning Kit?
3.A go through the Gun cleaning process and best cleaning kits